The last post of this series focused on setting up a pool of compute nodes on Azure Batch. In this part I show how to add jobs to a pool and then how to add tasks to a job. To summarize the nomenclature: a task is, in the context of CFD, a simulation, a job is a set of simulations.
It is possible to configure jobs directly from the portal by selecting Jobs in the side bar, and clicking on the “+Add” button:
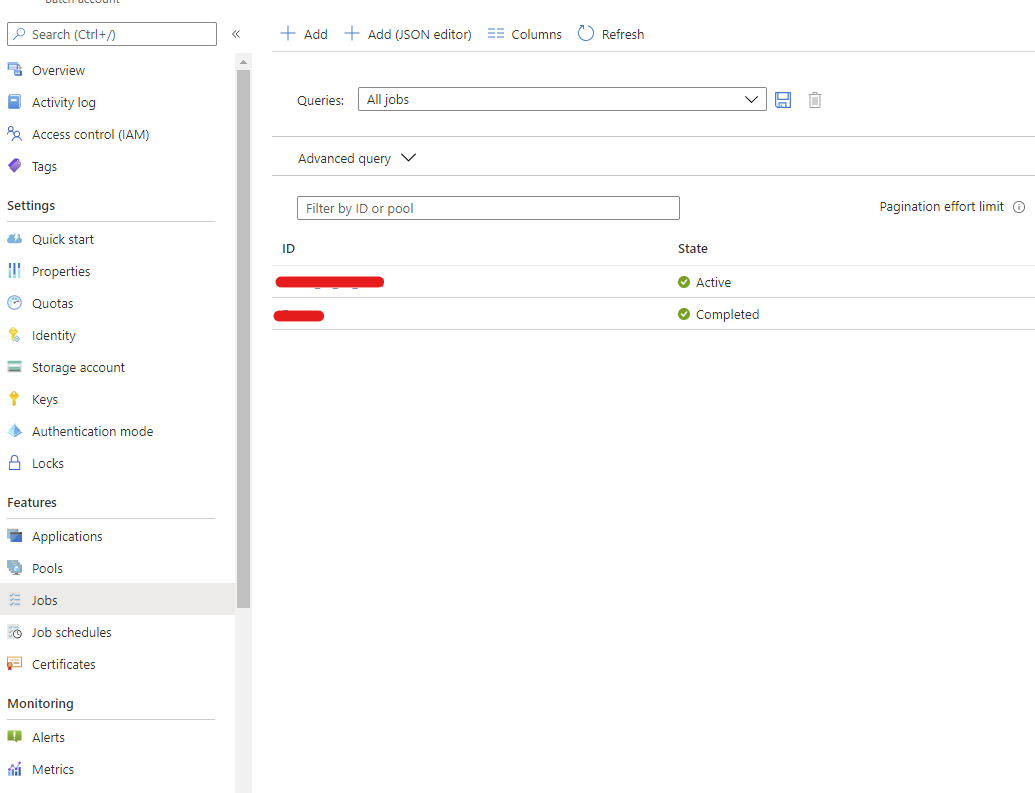
This will open the “Add job” screen:
where we have to select:
- The job id, following the rules indicated in the figure
- The pool (click and select the pool created in the previous part of this series of blog posts)
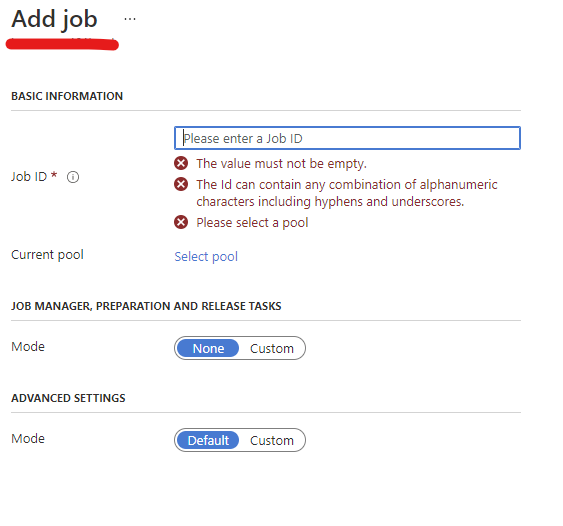
The Advanced Settings concern options to manage the job:

They allow to specify:
- A display name, more descriptive than the job id.
- A maximum wall clock time, after which the job and all its tasks are terminated. This option is useful to control costs in case jobs may run for a long time (i.e. a simulation which unexpectedly reduce the time step to extremely small values and may last for significantly longer than estimated, increasing costs).
- The number of attempts Azure Batch should make to rerun the job.
- Priority and task dependencies.
- What to do when all tasks complete, choosing between two options:
- No action (default)
- Terminate job
- What to do when a task fails:
- No action (default)
- Perform a specified action
For this guide, I only set to terminate the job when all tasks are completed. Wall time can be more effectively specified at the task level since it may be different for each task.
The job manager, preparation and release tasks should be set to custom in our setup:
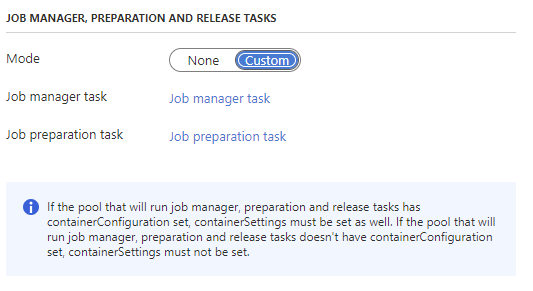
Selecting this option will show the following screen:
where a set of instructions to prepare the job can be set up.
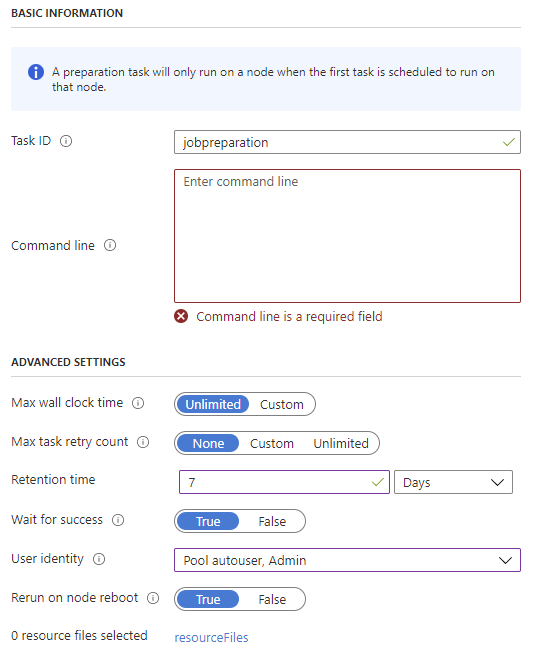
In my setup, the job preparation task executes a bash script that installs OpenFOAM® on the compute nodes. In order to simplify the process, I created a bash script that I store in the file share, in a directory called scripts:

The script to install the ESI version of OpenFOAM is called installOpenFOAMCom.sh, and its content is:
#!/bin/bash
# Install OpenFOAM on nodes
# Run as StartTask with Pool User Admin privileges

wget -q -O - https://dl.openfoam.com/add-debian-repo.sh | sudo bash
sudo apt-get install -qq openfoam2106-default
source /usr/lib/openfoam/openfoam2106/etc/bashrc
while that for the Foundation release of OpenFOAM is called installOpenFOAMOrg.sh and contains the following instructions:
#!/bin/bash
# Install OpenFOAM.org dev on nodes
# Run as StartTask with Pool User Admin privileges

sudo sh -c "wget -O - http://dl.openfoam.org/gpg.key | apt-key add -"
sudo add-apt-repository http://dl.openfoam.org/ubuntu
sudo add-apt-repository "http://dl.openfoam.org/ubuntu dev"
sudo apt-get update
sudo apt-get -qq install openfoam-dev
source /opt/openfoam-dev/etc/bashrc
The command line to run the first script is:
/bin/bash -c '$AZ_BATCH_NODE_MOUNTS_DIR/shareName/scripts/installOpenFOAMCom.sh'which must invoke the shell since Azure Batch does not automatically execute commands in a shell. Also note the use of the environment variable $AZ_BATCH_NODE_MOUNTS_DIR which points to the mount directory where the file share is mounted. The name of the share shareName should be replaced with the actual name of the file share.
The other options for the preparation task should be as in the figure. In particular:
- the job should wait for success of the preparation task before proceeding.
- the job must be executed as administrative user (it will install software) and on the pool (all nodes in the pool will need to run this task). The correct user identity is then:
Pool autouser, Admin. - If the node is rebooted, the preparation task must be repeated, or OpenFOAM won’t be available.
The job configuration is complete, since we won’t configure a job manager task. Clicking on OK will create the job.
The next step is adding a task, which is achieved by clicking on the job name, and in the job page, clicking on the “+Add” button. This will show the screen below:
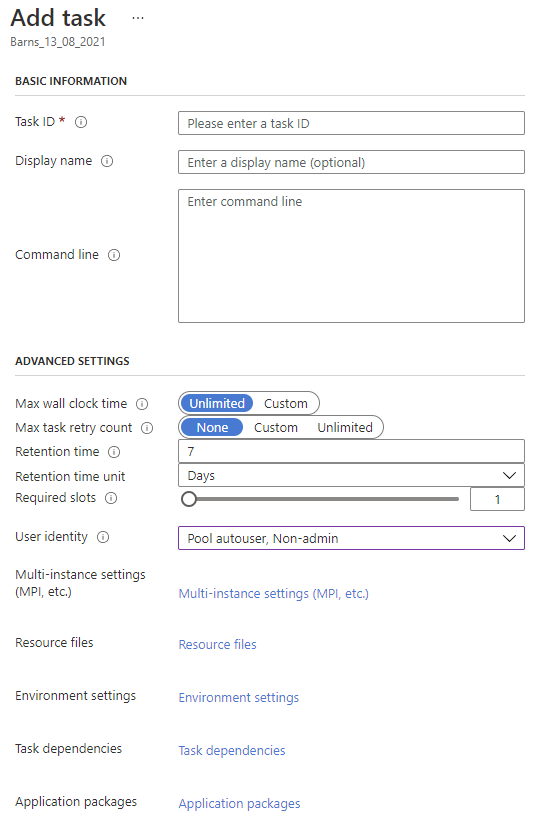
Task ID and Display name follow the same rules we have already met in previous parts. The command line to execute the simulation, based on the preparation described in the first part of this blog series is:
/bin/bash -c "cd $AZ_BATCH_NODE_MOUNTS_DIR/shareName/caseName/ && /usr/bin/openfoam2106 ./Allrun "
Note that the Allrun script to execute OpenFOAM commands is executed using the OpenFOAM shell, so that OpenFOAM commands are available. This facilitates the setup of the environment without having to configure environment variables explicitly.
Concerning the other options:
- The wall clock time should be set to a value sufficient to allow the simulation to complete.
- The User identity should be set to Pool autouser, Non-admin to execute the simulation without excessive privileges.
- Default values are used for the other options.
The task setup is complete: clicking the Submit button will commit the task to Azure Batch. The system will start the task as soon as soon as a node is ready to accomodate it.
One can add as many tasks as needed to a job, in order to complete a simulation campaign. However, if a wall time was specified for the job, it is worth remembering that only the tasks that will fit in that time will be completed.
Setting up jobs and tasks using C#
Setting up a job with the C# API for Azure Batch is straightforward:
CloudJob job = _batchClient.JobOperations.CreateJob(
    jobId: ...,
    poolInformation: new PoolInformation { PoolId = ... });

job.JobPreparationTask =
    new JobPreparationTask
    {
        CommandLine = ...,
        UserIdentity = new UserIdentity(
            new AutoUserSpecification(
                elevationLevel: ElevationLevel.Admin,
                scope: AutoUserScope.Task)),
        WaitForSuccess = true
    };

if (!string.IsNullOrEmpty(jobReleaseTaskCommand))
{
    job.JobReleaseTask
        = new JobReleaseTask { CommandLine = ... };
}

await job.CommitAsync();
where the … should be replaced by the corresponding strings.
Adding tasks is done in the code as follows:
// Create a list of tasks
private List<CloudTask> _taskList;

// Create a task
string taskCommandLine = "...";
CloudTask task = new CloudTask(taskId, taskCommandLine);

// Add the task to the task list
_taskList.Add(task);

// Add the task to the job and commit it
await _batchClient.JobOperations.AddTaskAsync(jobId, _taskList);
where the taskCommandLine is the command to execute the task, as shown before.
Now that the base concepts of how to use Azure Batch with OpenFOAM were shown, I recommend deepening your knowledge by reading the details in the official documentation for the service and the API, as well as exploring different storage options and setups.
Enjoy 🙂
This offering is not approved or endorsed by OpenCFD Limited, the producer of the OpenFOAM software and owner of the OPENFOAM® and OpenCFD® trade marks. Alberto Passalacqua is neither associated to OpenCFD Ltd nor to Microsoft and did not receive funding from them to write this article. All registered trade marks belong to their legal owners.
One Comment
Vladimir
Thank you Alberto! This set of tutorials is super useful.